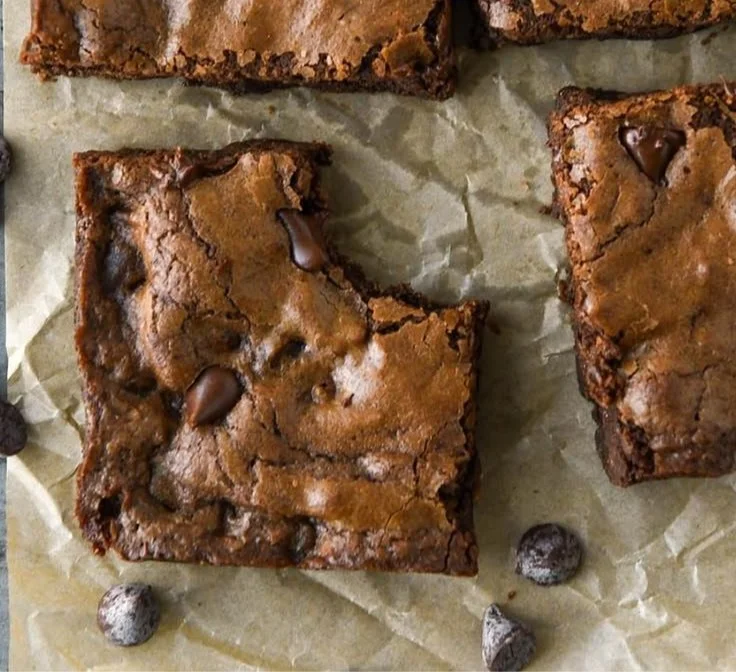
There’s something special that happens when you pull a pan of Easy Chocolate Brownies from the oven. The rich, gooey aroma wafts through the air, wrapping around you like a cozy blanket on a chilly day. I remember the first time I baked brownies with my grandmother. I was just a child then, standing on a wobbly stool, perched close to the counter, excitedly watching as she mixed the batter. Each ingredient felt like a secret to uncover. One minute, we danced to the music playing on the radio, and the next, we were measuring cocoa powder—its deep color an invitation to indulge. The was a recipe she kept so lovingly tucked away, and it became our family tradition over the years.
Every time I bake Easy Chocolate Brownies, I’m transported back to that sunlit kitchen in Asheville. The sound of laughter, the blend of sweet scents, and the shared joy of licking the mixing bowl remain etched in my heart. Bittersweet chocolate melted with a touch of sugar creates a luscious dance of flavors. When they cool, you cut them into squares and witness that decadent fudginess, the kind that leaves chocolate smudges on your fingers. With each hearty bite, I savor the memories of those precious moments and the love that went into every crumb.
Flavor and Popularity
The Unique Flavor Profile of Easy Chocolate Brownies
The allure of Easy Chocolate Brownies lies in their delightful complexity. While they may appear to be just another dessert, each bite reveals a layered mix of earthy chocolate and the right touch of sweetness. I often say that brownies are the ultimate comfort food, perfectly bridging the gap between cakey and fudgy.
A well-balanced brownie has a soft, yet firm texture. The use of quality chocolate elevates the flavor tenfold—choose bittersweet or semi-sweet for that deep chocolate experience. Adding a pinch of salt enhances the sweetness, creating a flavor dance that makes you reach for another piece. There’s something utterly satisfying about that melt-in-your-mouth sensation, especially when the edges have a slight crispiness, contrasting beautifully with the soft center.
Why This Recipe Is a Family Favorite and Crowd-Pleaser
Every family has its traditions, and in mine, Easy Chocolate Brownies hold a special place. They symbolize celebration, love, and togetherness. It became a rite of passage during birthdays or holidays to bake a batch. Friends and family would pop in, and as soon as the first whiff of brownies hit the air, you could see the smiles spread across faces.
This recipe is easy enough for the kids to help out, creating memories that they will cherish just like I do. The simple process of mixing ingredients creates laughter and joy, which is the magic of the kitchen. The best part? These brownies are a crowd-pleaser—everyone seems to have a different favorite way to enjoy them. Some like them fresh with a scoop of vanilla ice cream, while others love them topped with a sprinkle of powdered sugar. It’s heartwarming to see people gathered around a plate, sharing and enjoying something that, at its core, stems from happiness.
Ingredients and Preparation
Essential Ingredients and Possible Substitutions
To whip up your own batch of Easy Chocolate Brownies, you’ll want to gather a few key ingredients. Here’s what you’ll need:
- Butter: Use unsalted for better control over flavor.
- Granulated Sugar: This creates a chewy texture.
- Brown Sugar: Adds depth and moisture thanks to its molasses content.
- Eggs: They bind the ingredients and give structure.
- Vanilla Extract: A splash adds a warm note to the flavor.
- All-Purpose Flour: The structure is essential for good brownies.
- Cocoa Powder: Try unsweetened for a richer chocolate flavor.
- Chocolate Chips: Bittersweet or semi-sweet are classic choices.
For substitutions, don’t fret! You can swap applesauce for butter for a lighter version, or opt for coconut oil for a dairy-free option. Experimenting with different types of chocolate—like dark or even white chocolate—can give your brownies a delightful twist while keeping the essence of your Easy Chocolate Brownies intact.
Step-by-Step Recipe Instructions with Tips
-
Preheat Your Oven: Set your oven to 350°F (175°C). This ensures your brownies bake evenly.
-
Prepare the Pan: Grease your baking dish or line it with parchment paper. This will make it easy to lift your brownies out later.
-
Melt Butter and Chocolate: In a medium saucepan over low heat, melt together your butter and chocolate chips until smooth—stir often to avoid burning.
-
Mix Sugars: Remove from heat and whisk in both sugars until well combined.
-
Add Eggs and Vanilla: Stir in the eggs one at a time, followed by the vanilla extract. Mix until the batter is smooth and glossy.
-
Combine Dry Ingredients: Slowly fold in the flour, cocoa powder, and salt until just combined. Don’t over-mix; a few lumps are okay!
-
Add Chocolate Chips: Gently fold in any additional chocolate chips for that ooey-gooey goodness.
-
Bake: Pour the batter into your prepared pan and spread it evenly. Bake for about 25-30 minutes until the edges are set, but the center is still slightly soft (it will continue to cook as it cools).
-
Cool and Cut: Allow the brownies to cool completely in the pan before lifting them out (if using parchment). Cut into squares and enjoy!
Cooking Techniques and Tips
How to Cook Easy Chocolate Brownies Perfectly
The secret to perfecting your Easy Chocolate Brownies is in the baking. Always keep an eye on them as the baking time approaches the 25-minute mark. Remember, brownies will continue to set as they cool, so you want them to be a little underbaked for that chewy center. Additionally, resting for a while before cutting allows the flavors to meld beautifully.
Experimenting with different baking dishes can also yield unique textures; a glass pan offers a different finish compared to metal. Don’t hesitate to tweak the baking time based on your oven’s quirks—everyone’s kitchen tells a different story!
Common Mistakes to Avoid
As with any recipe, there are a few pitfalls to watch for when making your brownies. Firstly, avoid overmixing your batter, as this can lead to a dense texture. Secondly, be cautious with the oven temperature; using a higher heat can dry them out. Lastly, cutting them too soon can ruin that perfect fudgy consistency, so let them sit awhile and cool down after baking.
Health Benefits and Serving Suggestions
Nutritional Value of Easy Chocolate Brownies
While brownies are a treat, you may be surprised to learn there are some benefits, especially if you use quality dark chocolate. Dark chocolate is rich in antioxidants and can offer heart-health properties. Pairing your brownies with nuts can add protein and healthy fats. As with anything sweet, moderation is key, but indulging in a well-made brownie from time to time is a delicious way to bring joy into your life!
Best Ways to Serve and Pair This Dish
The beauty of brownies is their versatility. Serve them warm, straight from the oven, with a scoop of vanilla ice cream on top. Drizzling with caramel or chocolate sauce adds an elegant touch if you’re hosting. For a lovely twist, try pairing them with fresh berries or whipped cream. Each of these options enhances the overall experience, making every bite a celebration.
What type of mushrooms are best for Easy Chocolate Brownies?
You might be surprised, but mushrooms aren’t typically included in brownie recipes. However, if you’re looking to experiment with savory baking, earthy-flavored mushrooms such as shiitake or portabello can be sautéed and included in unique chocolate confections instead.
Can I use dried garlic instead of fresh?
When it comes to brownies, garlic is not a common ingredient, but if you’re thinking of incorporating savory aspects, using dried garlic powder could work. However, it’s best to rely on the sweet side for traditional brownies.
How do I store leftover Easy Chocolate Brownies?
After enjoying your brownies, you should store any leftovers in an airtight container at room temperature for up to three days. If you prefer them cold, refrigeration is an option, though it may alter the texture slightly.
Can I freeze Easy Chocolate Brownies?
Absolutely! You can freeze brownies for future enjoyment. Wrap them in plastic wrap and foil to prevent freezer burn, and they’ll be good for up to three months. Just remember to thaw them in the fridge or let them sit at room temperature before serving.
As I wrap up this nostalgic reflection on Easy Chocolate Brownies, I hope you’ll embrace the fun and joy these treats can bring. If you’re like me and find solace in the kitchen, there’s something comforting about creating a recipe that travels down memory lane while being enjoyed by new generations. The smiles and satisfaction from sharing brownies with loved ones are moments worth savoring. Trust me, you’ll want to make this again and again. Happy baking!
Print
Easy Chocolate Brownies
Indulge in these rich, gooey, and fudgy Easy Chocolate Brownies that are perfect for any occasion and create cherished memories.
- Total Time: 40 minutes
- Yield: 16 servings
Ingredients
- 1/2 cup unsalted butter
- 1 cup granulated sugar
- 1/2 cup brown sugar
- 2 large eggs
- 1 teaspoon vanilla extract
- 1 cup all-purpose flour
- 1/3 cup unsweetened cocoa powder
- 1/2 cup chocolate chips (bittersweet or semi-sweet)
Instructions
- Preheat your oven to 350°F (175°C).
- Prepare the pan by greasing or lining it with parchment paper.
- Melt the butter and chocolate chips together in a medium saucepan over low heat.
- Remove from heat and whisk in both sugars until well combined.
- Add the eggs one at a time, followed by the vanilla extract, mixing until smooth.
- Combine the flour, cocoa powder, and salt, folding until just combined.
- Add additional chocolate chips if desired.
- Bake for 25-30 minutes until the edges are set and the center is slightly soft.
- Cool completely before cutting into squares.
Notes
For a lighter version, you can substitute applesauce for butter. Ensure to keep an eye on baking time towards the end to avoid overbaking.
- Prep Time: 10 minutes
- Cook Time: 30 minutes
- Category: Dessert
- Method: Baking
- Cuisine: American
- Diet: Vegetarian