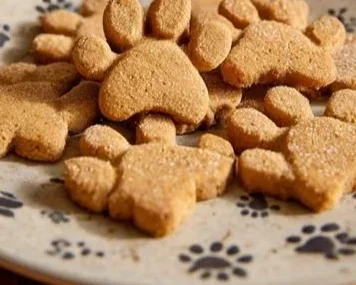
There’s something undeniably special about creating a moment of joy for our furry friends, and that’s exactly what I experienced the first time I made DIY Dog Cake Pops. It was a rainy afternoon in Asheville, and I felt a pull to do something fun and creative with my two golden retrievers, Bella and Max. As I rummaged through my kitchen, I stumbled upon some peanut butter and pumpkin puree left over from a baking adventure. Suddenly, the idea struck me: why not whip up some delightful DIY Dog Cake Pops for my pups?
I gathered my ingredients and, as I mixed the batter, the kitchen filled with the comforting aroma of peanut butter that made my heart swell with warmth. Bella and Max eagerly watched me, their tails wagging in excitement, as I shaped the pup-friendly treats into little balls, dipping them in a yogurt coating to give them that extra special touch. With each pop I created, I felt a sense of joy radiate not just from the treats but from the love I poured into them. It was a day filled with laughter, wagging tails, and that sweet, innocent gleam in my dogs’ eyes as they enjoyed the fruits of my labor. This little adventure became a cherished memory, one I carry with me each time I roll up my sleeves to make more DIY Dog Cake Pops.
Flavor and Popularity
The Unique Flavor Profile of DIY Dog Cake Pops
At first glance, DIY Dog Cake Pops may seem like whimsical creations meant solely for our canine companions. However, the thoughtful selection of flavors can transform these treats into something not just delectable for our pets but pleasing for us, too! The star ingredient, peanut butter, provides a rich and nutty profile that’s balanced beautifully by the smooth, creamy texture of yogurt. Add to that the natural sweetness of pumpkin and a hint of honey (if your pup can have it), and you’ve created a flavor profile that’s not only appealing but downright irresistible.
The earthy tones of the peanut butter blend seamlessly with the sweetness of pumpkin, resulting in an umami rich taste that even I couldn’t resist sneaking a little nibble of during the preparation! Just thinking about that mouthwatering combination makes my heart skip a beat! With each bite, your pooch will delight in a burst of flavors that send their tails wagging—happiness is truly the best ingredient, after all.
Why This Recipe Is a Family Favorite and Crowd-Pleaser
Beyond their scrumptious flavors, DIY Dog Cake Pops have firmly established themselves as a family favorite that transcends mere treats. Every time I create these delights, I’m reminded of the joy they bring not just to my pups but to everyone who encounters them. Friends and neighbors often stop by for a chat, and it’s become a tradition for me to offer them a taste of the “pup treats” made specially for their furry companions. The smiles on their faces mirror my own, and I can’t help but chuckle as their dogs’ excited reactions steer the conversations!
Making these treats is also a lovely way to bond with my family. My grandchildren love to help whisk together the ingredients and roll them into perfect little pops. Each batch becomes a memory, an opportunity to share laughter and love—not just with my dogs, but with the people I hold dear. The delightful anticipation in the room as the pups circle around me, eagerly waiting for their turn to taste, adds another layer of warmth to our gatherings. In a busy world that often feels disconnected, these DIY Dog Cake Pops offer a sweet reminder that simple pleasures and shared moments create lasting happiness.
Ingredients and Preparation
Essential Ingredients and Possible Substitutions
To bring your DIY Dog Cake Pops to life, you’ll want to gather a few essential ingredients. Here’s what you’ll need:
- Peanut Butter: Choose a natural, unsweetened variety without xylitol, as that’s toxic for dogs. Creamy works best for easy mixing.
- Pumpkin Puree: Make sure it’s pure pumpkin and not pie filling to avoid excess sugar and spices.
- Oats: Rolled oats add a nice texture, and you can blend them to a finer consistency if your dog is sensitive to larger pieces.
- Carrots: Grated for added sweetness and crunch. Feel free to use baby food if it’s easier!
- Greek Yogurt: Plain, unsweetened yogurt provides a lovely coating that adds to the pops’ nutritional value.
- Honey: Use sparingly for an added touch of sweetness; it’s safe for dogs in moderation.
- Optional toppings: Try shredded coconut or crushed dog-friendly treats for a fun finish!
Don’t panic if you don’t have everything on hand! Substitute almond butter or sunbutter for the peanut butter, or swap pumpkin for sweet potato. This flexibility ensures you can create a batch of these pops with what you have available.
Step-by-Step Recipe Instructions with Tips
Creating your own DIY Dog Cake Pops is simple and deeply rewarding. Here’s how you can do it:
Step 1: Preheat and Prepare
Start by preheating your oven to 350°F. Line a baking sheet with parchment paper to prevent sticking.
Step 2: Mix the Batter
In a mixing bowl, combine 1 cup of peanut butter, 1 cup of pumpkin puree, 1 cup of oats, and a half cup of grated carrots. If you want to add honey, mix in a tablespoon or so. Stir until all ingredients are well incorporated.
Step 3: Form the Pops
Using your hands, roll the mixture into small balls, about the size of a golf ball. Place them on the lined baking sheet, leaving a little space between each pop.
Step 4: Bake
Bake in the preheated oven for about 15 to 20 minutes or until lightly golden. Let them cool completely.
Step 5: Coat with Yogurt
Once the pops have cooled, melt your Greek yogurt slightly. Dip each cake pop into the yogurt, allowing excess to drip off. For an extra touch, roll them in shredded coconut or crushed treats.
Step 6: Chill and Serve
Place the coated pops back onto the baking sheet and chill in the refrigerator until the yogurt sets. Once firm, they’re ready for your pups to enjoy!
And remember, you can create custom-sized pops according to your pup’s preference—small bites or larger treats, the choice is yours!
Cooking Techniques and Tips
How to Cook DIY Dog Cake Pops Perfectly
Cooking these pops is straightforward, but a few tips can help you create batches that look and taste fabulous. Ensure your ingredients are at room temperature before mixing; this makes for easier blending. When rolling the pops, wet your hands slightly to prevent sticking. It’s also essential to let the cake pops cool completely before dipping them in yogurt. This prevents the yogurt from melting and losing its shape!
Common Mistakes to Avoid
Be cautious not to add any ingredients that are poisonous to dogs, such as chocolate or certain artificial sweeteners. Keeping an eye on the baking time is important; overbaking can dry out the pops, making them less appetizing. Also, when coating, ensure you cover the pops thoroughly to create a nice layer but allow excess yogurt to drip off, so you don’t end up with puddles.
Health Benefits and Serving Suggestions
Nutritional Value of DIY Dog Cake Pops
These delightful treats are not just about fun; they are packed with nutrients that are great for your pups. Peanut butter provides protein and healthy fats that support muscle growth, while pumpkin is rich in fiber and aids digestion. Oats will give your dogs an energy boost, and carrots add essential vitamins like A and C. Yogurt introduces probiotics, promoting digestive health. All in all, these cake pops can serve as wholesome snacks in moderation.
Best Ways to Serve and Pair This Dish
When it comes to serving, I like to offer these pops as special treats on occasion or during celebrations—like my pups’ birthdays (yes, we throw little parties!). You can present them on a fun doggie platter that elevates the moment. Pair these pops with a refreshing bowl of water or a side of fresh fruit, like blueberries or watermelon, which are also healthy and hydrating.
FAQ Section
What type of mushrooms are best for DIY Dog Cake Pops?
While mushrooms aren’t an ingredient in DIY Dog Cake Pops, if you’re looking to create a dog-friendly recipe that incorporates mushrooms, stick to safe varieties like cooked button or shiitake. However, always check for allergies and stick with the ingredients known to be beneficial for your pups.
Can I use dried garlic instead of fresh?
Garlic should be avoided in dog treats altogether, even in small amounts. While some recipes call for a hint of garlic for flavor in human food, it can be toxic to dogs, so make sure to stick to known dog-safe seasonings.
How do I store leftover DIY Dog Cake Pops?
Store any leftover pops in an airtight container in the refrigerator for up to a week. If you use the yogurt coating, it’s best eaten within a few days while it remains fresh.
Can I freeze DIY Dog Cake Pops?
Absolutely! You can freeze them for up to three months. Lay them flat in a single layer on a baking sheet until solid, then transfer them to a freezer-safe bag. Remember to let them thaw slightly before serving to your pups.
Conclusion
If you’re like me, there’s nothing more satisfying than whipping up a special treat for your furry family members. DIY Dog Cake Pops are not only easy to make, but they also create lovely moments of happiness for both dogs and their humans. Trust me; you’ll want to make these again and again! There’s something comforting about being in the kitchen, creating magic one pop at a time, and seeing my pups’ joyful faces as they enjoy the fruits of my labor. Grab your ingredients, roll up your sleeves, and let your love for cooking shine—both you and your canine companions will cherish the results!
Print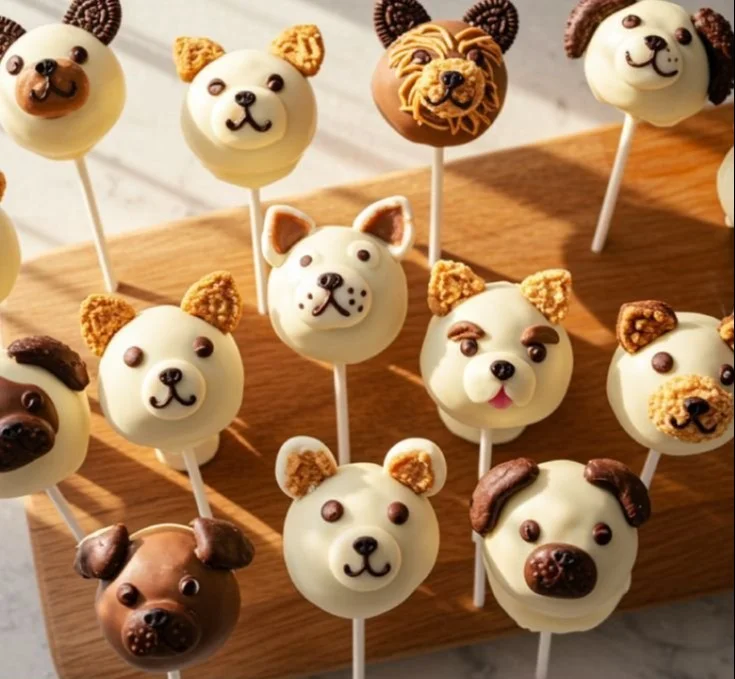
DIY Dog Cake Pops
Delight your furry friends with these easy and nutritious DIY Dog Cake Pops made from peanut butter, pumpkin, oats, and yogurt.
- Total Time: 35 minutes
- Yield: 10 servings
Ingredients
- 1 cup peanut butter (natural and unsweetened)
- 1 cup pumpkin puree (pure pumpkin, not pie filling)
- 1 cup rolled oats
- 1/2 cup grated carrots
- 1 tablespoon honey (optional)
- 1 cup plain Greek yogurt (for coating)
- Optional toppings: shredded coconut or crushed dog-friendly treats
Instructions
- Preheat your oven to 350°F. Line a baking sheet with parchment paper.
- Mix together the peanut butter, pumpkin puree, oats, and grated carrots in a mixing bowl until well incorporated.
- Roll the mixture into small balls, about the size of a golf ball, and place them on the prepared baking sheet.
- Bake in the preheated oven for 15 to 20 minutes until lightly golden and let them cool completely.
- Dip each cooled cake pop into the melted Greek yogurt, allowing excess to drip off. Optionally, roll in shredded coconut or crushed treats.
- Chill the coated pops in the refrigerator until the yogurt sets, then serve to your pups.
Notes
Ensure ingredients are at room temperature for easier mixing. Store leftovers in an airtight container in the fridge for up to a week.
- Prep Time: 15 minutes
- Cook Time: 20 minutes
- Category: Treats
- Method: Baking
- Cuisine: Dog Food
- Diet: Pet-friendly