Stained Glass Cookies hold a special place in my heart, and I’ll never forget the first time I made them alongside my grandmother in her warm, sunlit kitchen. On that rainy afternoon, the sound of the pitter-patter outside only added to the coziness as we rolled out the dough and watched as vibrant candies melted, forming those stunning “stained glass” windows. The kitchen filled with the sweet scent of butter and sugar, mingling with the laughter we shared over stories of her childhood. As the cookies baked, the colorful swirls hinted at the joy contained within each piece—a beautiful reminder of how simple ingredients can create something truly magical.
Now, every time I bake Stained Glass Cookies, I’m transported back to that kitchen, those moments that felt so big to my young heart. They spark joy in my family and friends alike. I love to prepare these cookies for special occasions, but they are just as wonderful—if not more so—when made on a quiet evening just because. The beauty of Stained Glass Cookies lies not only in their appearance but in the love that fills each bite.
Flavor and Popularity
The Unique Flavor Profile of Stained Glass Cookies
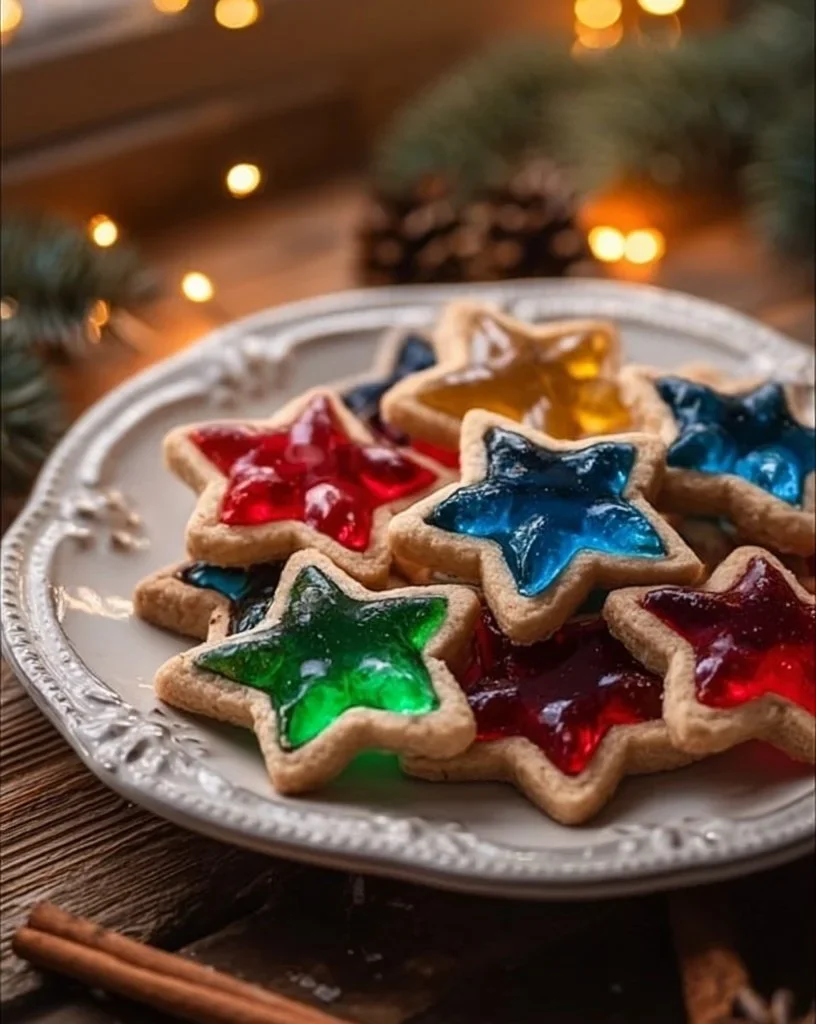
Stained Glass Cookies are an exquisite blend of buttery shortbread and sweet, crystalline candy. The buttery richness creates a comforting backdrop, while the melted candy contributes a burst of fruity flavors—think cherry, lemon, or blueberry. This creates an unexpected yet delightful contrast that’s different from the average cookie. The texture is crisp on the edges with a soft center, and each bite breaks open to reveal vibrant, jewel-like surprises that glisten like stained glass in the sun.
What I cherish the most, however, is how they can appeal to all ages. Kids love the colors and the fact that they’re edible art, while adults can appreciate the nostalgic comfort these cookies provide. They’re perfect for birthdays, holiday gatherings, or just a cozy afternoon with a cup of coffee.
Why This Recipe Is a Family Favorite and Crowd-Pleaser
In my home, Stained Glass Cookies symbolize togetherness. They bring everyone to the kitchen, ready to help in the crafting process. The act of rolling, cutting, and decorating the cookies turns into bonding time, creating memories like the ones I cherish with my grandmother. There’s something joyous about watching guests dive eagerly into a plate of these cookies, eyes lighting up as they sample the colorful treats. They have a knack for sparking conversations and evoking nostalgic stories, making them not just a snack but a centerpiece for connection.
The versatility and visual appeal make them a crowd-pleaser, suitable for any occasion. They steal the show on cookie platters, and their simple recipe means anyone can whip them up with a little patience. Trust me, once you share these cookies with others, they will always ask for more!
Ingredients and Preparation
Essential Ingredients and Possible Substitutions
To embark on making Stained Glass Cookies, you’ll need to gather a handful of essential ingredients. Here’s what you’ll want to have ready:
- All-purpose flour: The base for the cookie dough. It gives structure and a light texture.
- Unsalted butter: This adds richness and flavor; always best at room temperature for easy blending.
- Granulated sugar: Provides sweetness and aids in achieving that perfect crisp.
- Egg yolks: These enrich the dough and add a lovely golden hue.
- Vanilla extract: For that classic, comforting flavor that pairs beautifully with the candy.
- Hard candies: Look for colorful varieties like Jolly Ranchers or Lifesavers to create the “stained glass” effect.
If you find yourself short on an ingredient, don’t fret! You can swap out the granulated sugar for brown sugar to add a hint of caramel flavor. For a touch of spice, try incorporating almond extract instead of vanilla. Any hard candies you have on hand will work; just remember, the more colorful, the better!
Step-by-Step Recipe Instructions with Tips
-
Prepare Dough: In a large mixing bowl, cream together the softened butter and sugar until light and fluffy. Add the egg yolks and vanilla extract, mixing until well combined. Gradually add the flour, stirring until the dough forms. It will feel soft but not sticky.
-
Chill the Dough: Wrap the dough in plastic wrap and refrigerate for at least one hour. This helps the cookies maintain their shape while baking.
-
Prepare for Rolling: Preheat your oven to 350°F (175°C). Line two baking sheets with parchment paper.
-
Roll Out the Dough: On a floured surface, roll out the chilled dough to about 1/4 inch thick. Use cookie cutters to create your desired shapes. Don’t forget to use a smaller cutter to cut out the center where the candy will go.
-
Fill with Candy: Place each cookie onto the prepared baking sheets and fill the center cutouts with crushed hard candy pieces. These will melt, creating that stained glass effect.
-
Bake: Bake cookies in your preheated oven for 8-10 minutes, or until the edges are lightly golden. Watch them closely; you want them just set, with the candy melted but not burnt!
-
Cool and Enjoy: Let the cookies cool on the baking sheet for a few minutes before transferring them to a wire rack to cool completely.
A little tip: If the candy bubbles up and overflows, don’t worry! It adds character to your cookies, and it’s all part of the charm!
Cooking Techniques and Tips
How to Cook Stained Glass Cookies Perfectly
Patience is key when working with Stained Glass Cookies. Ensure your dough is chilled properly to avoid spreading while baking. Incorporating the right amount of flour will help achieve that perfect consistency that holds shape but isn’t overly tough. When placing candy in the cutouts, don’t fill it to the brim—leave a little room to expand as the cookies bake.
Common Mistakes to Avoid
One common mistake is using warm dough, which can lead to cookies that spread too much. Additionally, neglecting to chill the dough will result in flat cookies. Make sure to monitor the baking time closely; over-baking can lead to dark edges and loss of the soft center we cherish about these cookies.
Health Benefits and Serving Suggestions
Nutritional Value of Stained Glass Cookies
While Stained Glass Cookies offer a delightful treat, enjoying them in moderation is key. Each cookie is rich in sugar and fat, so they should remain a special occasion dessert. You can feel a tad better by opting for natural ingredients when available, and even using organic sugars if you prefer.
Best Ways to Serve and Pair This Dish
These cookies shine best when displayed on a cheerful platter at gatherings, where their vibrant colors can delight the eye. Serve them alongside a warm cup of tea or a glass of cold milk for a classic pairing that brings a sense of nostalgia. You might even consider packaging them as gifts during the holidays; they make for a delightful treat for friends and family.
FAQ Section
What type of mushrooms are best for Stained Glass Cookies?
While the term "mushrooms" doesn’t directly apply to Stained Glass Cookies, incorporating fun and whimsical decorations into the dough can include candy shapes that resemble mushrooms! This would add a playful element, especially for kids.
Can I use dried garlic instead of fresh?
For Stained Glass Cookies, garlic isn’t an ingredient! This sweet treat emphasizes candies and sugars, so just look for those vibrant sweets instead!
How do I store leftover Stained Glass Cookies?
To keep your cookies fresh and delicious, store them in an airtight container at room temperature. They should remain crisp for about a week. If you live in a humid area, placing a slice of bread in the container can help absorb moisture.
Can I freeze Stained Glass Cookies?
Yes, you can definitely freeze these cookies! Place them in a single layer in an airtight container separated by parchment paper. They can last up to three months in the freezer, ensuring you always have a colorful treat on hand whenever the craving strikes!
Conclusion
If you’re like me, there’s something comforting about the act of baking, especially when it means creating memories with loved ones. Stained Glass Cookies are not just delightful morsels but pieces of art and heart. As you prepare to make these scrumptious cookies, I encourage you to bring your family into the process—let them roll, cut, and fill with you. Trust me, you’ll want to make this treat again and again. The joy they bring, both in taste and the shared experience, is truly one of life’s sweetest pleasures.

Stained Glass Cookies
Delightful cookies filled with melted candies creating a beautiful stained glass effect, perfect for special occasions or just because.
- Total Time: 70 minutes
- Yield: 24 cookies
Ingredients
- 2 1/2 cups all-purpose flour
- 1 cup unsalted butter, softened
- 1 cup granulated sugar
- 3 egg yolks
- 1 teaspoon vanilla extract
- 1 cup crushed hard candies (e.g., Jolly Ranchers, Lifesavers)
Instructions
- Cream together the softened butter and sugar until light and fluffy.
- Add the egg yolks and vanilla extract, mixing until well combined.
- Gradually add the flour, stirring until the dough forms.
- Wrap the dough in plastic wrap and refrigerate for at least one hour.
- Preheat your oven to 350°F (175°C) and line two baking sheets with parchment paper.
- On a floured surface, roll out the chilled dough to about 1/4 inch thick and use cookie cutters to cut shapes.
- Fill the center cutouts with crushed hard candy pieces.
- Bake for 8-10 minutes or until edges are lightly golden.
- Let the cookies cool on the baking sheet for a few minutes before transferring to a wire rack.
Notes
If the candy bubbles over, it adds character to the cookies. Store in an airtight container at room temperature for about a week.
- Prep Time: 60 minutes
- Cook Time: 10 minutes
- Category: Dessert
- Method: Baking
- Cuisine: American
- Diet: Vegetarian