There’s a deep-rooted magic in sharing food, and Red Velvet Whoopie Pies hold a special place in my heart. I still remember the first time I laid eyes on these whimsical little treats at a county fair. The vibrant red hue grabbed my attention, but it was the cream cheese frosting peeking from between those soft, cake-like cookies that truly captured my soul. I was with my grandmother, who had a knack for baking up joy, and we both knew we had to have one.
As I bit into the whoopie pie, a burst of flavor enveloped me—sweet but not overwhelmingly so, with a hint of cocoa and a lovely tang from the frosting. It was a taste of nostalgia mixed with something new and exciting. I knew right then that I would take this delightful dessert and weave it into the fabric of my own cooking tradition. To me, Red Velvet Whoopie Pies are not just a dessert; they’re a way to connect with loved ones, a bridge from my grandmother’s kitchen to my own.
Now, every time I whip up a batch, I’m transported back to the fair. The laughter, the carefree spirit of the day, and the joy of sharing that first bite with family—all come rushing back. Whether it’s a holiday gathering or just a quiet afternoon baking session, these whoopie pies always bring smiles and perfect moments.
Table of Contents
Flavor and Popularity
The Unique Flavor Profile of Red Velvet Whoopie Pies
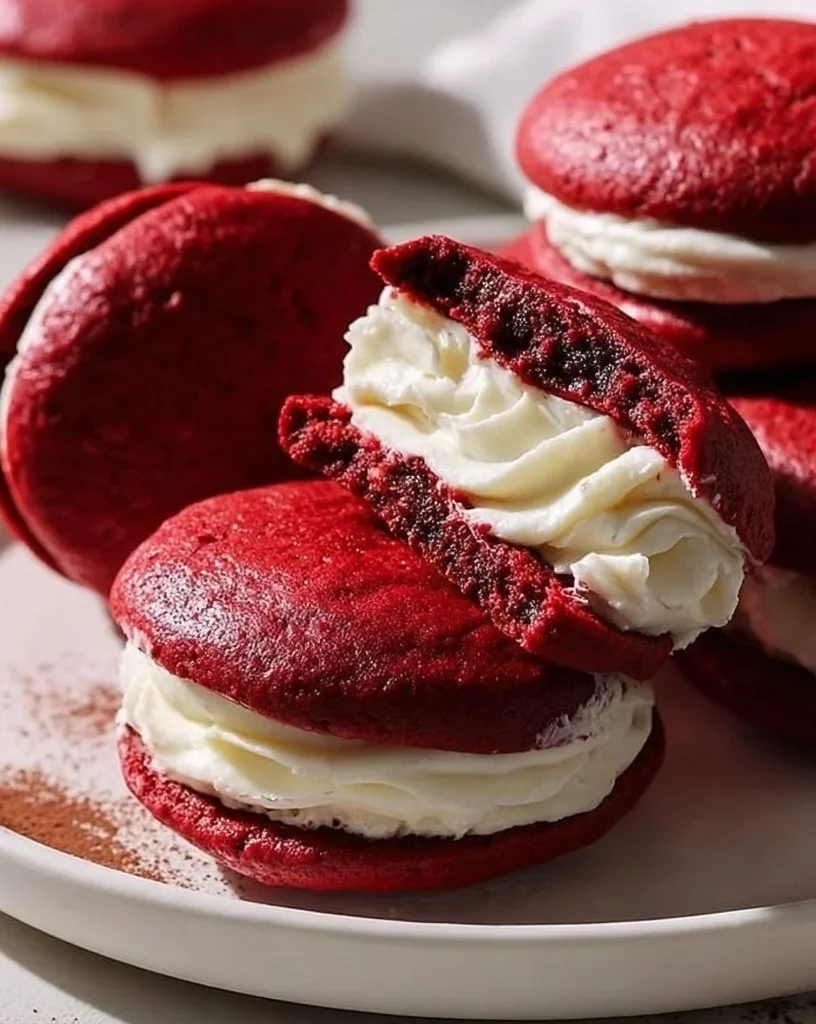
Red Velvet Whoopie Pies tell a tale of love through their unique flavor profile. At first bite, your taste buds are met with the sweetness of the soft cookies, which are gently infused with cocoa. It’s a subtle flavor, almost like a whisper, adding depth without overpowering the sweetness. The magic happens when you introduce the luscious cream cheese filling. It’s rich and slightly tangy, perfectly balancing the sweetness of the cake. Each bite is a delightful dance on your palate, where the velvety softness of the whoopie pie gives way to that creamy center, creating a harmonious blend that makes it difficult to stop at just one.
What truly elevates the experience is how versatile this treat can be. You can add a dash of vanilla or a sprinkle of cocoa powder to the cream cheese filling for an extra twist. The delightful mix of flavors and textures makes Red Velvet Whoopie Pies a perfect candidate for any occasion—from birthday parties to cozy gatherings or even just an afternoon pick-me-up.
Why This Recipe Is a Family Favorite and Crowd-Pleaser
Who doesn’t love a treat that has everyone coming back for more? In my home, Red Velvet Whoopie Pies are a symbol of celebration. My family flocks to the kitchen when they catch a whiff of those warm cookies baking, excitedly waiting for the finished product. They’re simple to make, which means that even the youngest of my grandchildren can lend a helping hand, measuring and mixing while giggling over a flour-filled counter.
The secret to their popularity? They look as good as they taste. Their vibrant red color attracts eyes, while the soft, fluffy texture has people coming back for seconds—and often thirds. I remember when my daughter brought them to a potluck gathering. Everyone raved about them! The simplicity of a whoopie pie combined with the rich flavors of red velvet makes them a standout dessert. Plus, they’re portable—perfect for sharing!
Ingredients and Preparation
Essential Ingredients and Possible Substitutions
To craft the perfect Red Velvet Whoopie Pies, you need the following ingredients:

- All-purpose flour: The base of the cookies, giving them structure.
- Unsweetened cocoa powder: Just a touch adds rich chocolate depth without overwhelming the red color.
- Baking soda and baking powder: These leavening agents create that lovely, soft texture.
- Salt: Enhances all the flavors present.
- Vegetable oil: Keeps the cookies moist and tender.
- Sugar: A mix of granulated and brown sugar for sweetness and depth.
- Eggs: Bind the mixture together and add richness.
- Buttermilk: This ingredient is key; it contributes moisture and a slight tang.
- Red food coloring: The star of the show, giving the whoopie pies their distinctive hue.
- Vanilla extract: For that warm, comforting flavor.
- Cream cheese: Used for the filling, providing a creamy, tangy contrast to the cookie.
If you need substitutions, don’t fret! You can use whole wheat flour for a healthier option or use a gluten-free blend if that suits your dietary needs. If you don’t have buttermilk on hand, mix milk with a splash of vinegar and let it sit for a few minutes—you’ll achieve a similar result. As for the food coloring, a natural alternative like beet juice can give you that lovely red hue without any artificial additives.
Step-by-Step Recipe Instructions with Tips
Let’s dive into making these delightful Red Velvet Whoopie Pies!
- Preheat your oven to 350°F (175°C). Line a baking sheet with parchment paper.
- In a large bowl, sift together the flour, cocoa powder, baking soda, baking powder, and salt.
- In another bowl, whisk together the vegetable oil, granulated sugar, brown sugar, eggs, buttermilk, vanilla extract, and food coloring until well combined.
- Gradually add the dry ingredients to the wet mixture, gently folding until just combined. Be careful not to overmix; a few lumps are okay!
- Using a cookie scoop or tablespoon, drop rounded tablespoons of dough onto the prepared baking sheet, making sure to leave space between each mound.
- Bake for 10-12 minutes, or until the tops are set and spring back lightly when touched. Let cool on the pan for a few minutes before transferring to a wire rack to cool completely.
- For the filling, beat together the cream cheese, butter, powdered sugar, and a splash of vanilla extract until creamy and smooth.
- Once the cookies have cooled, spread a generous spoonful of filling onto the flat side of one cookie and sandwich it with another cookie.
Believe me; it’s hard to resist sneaking a bite before they even reach the dessert table!
Cooking Techniques and Tips
How to Cook Red Velvet Whoopie Pies Perfectly
Cooking your Red Velvet Whoopie Pies perfectly welcomes you to a world where texture matters. Ensure your ingredients are at room temperature—this helps them blend more evenly. When mixing the batter, gentle folding prevents overworking the gluten, keeping your cookies light and tender.
Watch your baking time closely; every oven is different. You want them to bounce back to a light touch, signaling they’re done baking but still remain soft. Trust your instincts!
Common Mistakes to Avoid
A few common slip-ups can sabotage your whoopie pies. Overmixing can lead to tough cookies, so mix until just combined. Using too much food coloring can result in an artificial taste, so a little goes a long way—start small! And please, don’t skip cooling the cookies completely. If you fill warm cookies, the frosting will melt, and you’ll end up with a delightful mess that, while delicious, isn’t quite the elegant treat you envisioned!

Health Benefits and Serving Suggestions
Nutritional Value of Red Velvet Whoopie Pies
While Red Velvet Whoopie Pies aren’t necessarily health food, they can be enjoyed in moderation! The cookies provide a sweet dose of happiness, and using cream cheese adds a bit of protein and calcium. Consider them a special treat to savor on occasion.
For those who want to make them slightly healthier, you could experiment with incorporating whole wheat flour or using less sugar in the frosting. Remember, balance is key—in both life and dessert!
Best Ways to Serve and Pair This Dish
Serve Red Velvet Whoopie Pies on a colorful platter, perhaps alongside a beautiful bouquet of flowers. They make a lovely centerpiece for any occasion. If you want to elevate the experience, consider pairing them with a glass of milk or a bright, fruity iced tea. Not only does this add a fun touch, but it also enhances the overall taste experience.
Think about serving these delightful pies at birthdays, holidays, or simply as an indulgence on a cozy afternoon. You could even add a sprinkle of powdered sugar on top just before serving for that extra charm!
FAQ Section
What type of mushrooms are best for Red Velvet Whoopie Pies?
Mushrooms aren’t typically included in Red Velvet Whoopie Pies, as this dessert focuses on sweetness and flavor, relying on cocoa and cream cheese. However, if you’re referring to a savory aspect in baking, fresh mushrooms are generally preferred for their earthy flavor and texture.
Can I use dried garlic instead of fresh?
Dried garlic isn’t suitable for this sweet creation. Red Velvet Whoopie Pies celebrate sugar, cocoa, and cream cheese, so stick with sweet, creamy, and delightful ingredients.
How do I store leftover Red Velvet Whoopie Pies?
To store leftover Red Velvet Whoopie Pies, place them in an airtight container at room temperature if consumed within a few days. For longer storage, refrigerate them to keep the cream cheese filling fresh.
Can I freeze Red Velvet Whoopie Pies?
Absolutely! These lovely treats freeze beautifully. Just wrap each one in plastic wrap and place them in a sealed freezer bag. Thaw at room temperature, and they’ll be just as delightful as when they were freshly made.
Conclusion
If you’re like me, there’s something comforting about gathering everyone around, sharing a batch of Red Velvet Whoopie Pies, and hearing the laughter and chatter fill the kitchen. It’s not just about the baking; it’s about the love and joy that goes into each bite. Trust me, you’ll want to make this again and again, not just to savor the delicious flavors but to create cherished memories that will last a lifetime. So, grab your apron and whip up a batch—you’re in for a treat!
Print
Red Velvet Whoopie Pies
Delightful soft cookies filled with creamy tangy frosting, perfect for any occasion.
- Total Time: 27 minutes
- Yield: 12 servings
Ingredients
- 2 cups all-purpose flour
- 2 tablespoons unsweetened cocoa powder
- 1 teaspoon baking soda
- 1 teaspoon baking powder
- 1/2 teaspoon salt
- 1/2 cup vegetable oil
- 1 cup granulated sugar
- 1/2 cup brown sugar
- 2 large eggs
- 1 cup buttermilk
- 2 tablespoons red food coloring
- 1 teaspoon vanilla extract
- 8 oz cream cheese
- 1/4 cup butter
- 2 cups powdered sugar
Instructions
- Preheat your oven to 350°F (175°C). Line a baking sheet with parchment paper.
- In a large bowl, sift together the flour, cocoa powder, baking soda, baking powder, and salt.
- In another bowl, whisk together the vegetable oil, granulated sugar, brown sugar, eggs, buttermilk, vanilla extract, and food coloring until well combined.
- Gradually add the dry ingredients to the wet mixture, gently folding until just combined.
- Using a cookie scoop or tablespoon, drop rounded tablespoons of dough onto the prepared baking sheet, leaving space in between each mound.
- Bake for 10-12 minutes, or until the tops are set and spring back lightly when touched. Let cool on the pan for a few minutes before transferring them to a wire rack.
- For the filling, beat together the cream cheese, butter, powdered sugar, and a splash of vanilla extract until creamy and smooth.
- Once the cookies have cooled, spread a generous spoonful of filling onto the flat side of one cookie and sandwich it with another cookie.
Notes
For a healthier option, try whole wheat flour or a gluten-free blend. Also, you can opt for natural food coloring alternatives.
- Prep Time: 15 minutes
- Cook Time: 12 minutes
- Category: Dessert
- Method: Baking
- Cuisine: American
- Diet: Vegetarian