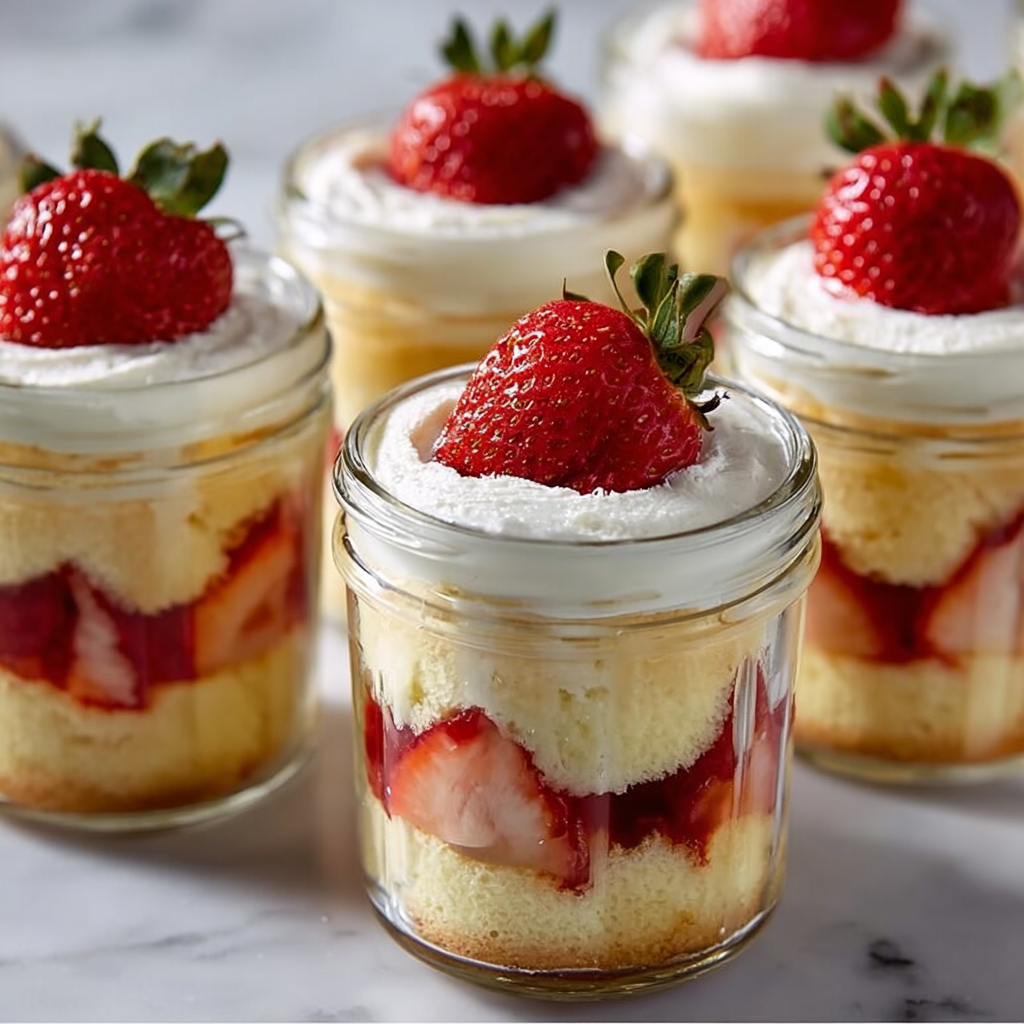
I still remember the first time I tried making mini three milk cups. It was one of those warm summer evenings when my nieces came over, buzzing with excitement after a day of playing in the backyard. I wanted something sweet, cool, and comforting to end the night, but I didn’t want the heaviness of a big cake. That’s when I thought about those tender little cups, soaked in the goodness of three different kinds of milk. The moment I served them, the room grew quiet except for the sound of spoons gently tapping the glass jars. The creaminess melted across the tongue, balanced by just the right amount of sweetness, and I knew right then that these would become a new family tradition. Making mini three milk cups feels like bottling up joy in single servings—each bite soft, indulgent, and brimming with love.
Table of Contents
Flavor and Popularity
The Unique Flavor Profile of Mini Three Milk Cups
Mini three milk cups carry a flavor that is both luxurious and humble at the same time. The sponge base absorbs evaporated milk, condensed milk, and heavy cream, creating a texture that is almost cloudlike. It isn’t overly sweet, thanks to the balance of milks, but instead leans into that irresistible creaminess that lingers after every bite. The lightness of the sponge contrasts beautifully with the richness of the milk mixture, making every spoonful indulgent yet never overwhelming. A little cinnamon dusting or a drizzle of caramel can add a gentle twist, but at its heart, this dessert stays true to its heritage—comforting, creamy, and unforgettable.
Why This Recipe Is a Family Favorite and Crowd-Pleaser
Part of the magic of mini three milk cups is how versatile they are. Because they’re portioned individually, they’re perfect for parties, family gatherings, or even casual weeknight treats. Guests love them because they look adorable in little jars or cups, and hosts love them because they’re easy to make ahead of time. When I serve them at family dinners, everyone reaches for their cup with a smile—it feels like getting your very own dessert made just for you. These cups also adapt beautifully to different flavors. Some folks top them with strawberries, while others prefer whipped cream and chocolate shavings. That flexibility makes them a true crowd-pleaser.
Ingredients and Preparation
Essential Ingredients and Possible Substitutions
To make mini three milk cups, you’ll need just a few essentials:
- Sponge cake base: Light, airy sponge or even a simple vanilla cake works beautifully.
- Evaporated milk: Adds a smooth, caramelized depth.
- Sweetened condensed milk: Brings richness and sweetness.
- Heavy cream: Provides luxurious texture and body.
- Eggs: Key for giving the sponge its structure.
- Sugar: Just enough to sweeten the cake before soaking.
- Vanilla extract: Enhances the flavor profile with warmth.
For substitutions, you can use whole milk or half-and-half if heavy cream isn’t available. If you’d like a lighter version, try coconut milk for a tropical twist. For the sponge, gluten-free flour can be used without sacrificing too much texture. Lactose-free condensed milk is also an option for those with dietary needs.

Step-by-Step Recipe Instructions with Tips
- Begin by baking a light sponge cake in a large pan, ensuring it stays fluffy and not overly dense.
- Allow the cake to cool completely before cutting it into small rounds that fit perfectly into cups or jars.
- In a mixing bowl, whisk together evaporated milk, condensed milk, and heavy cream until well combined.
- Place the cake rounds into cups and slowly pour the milk mixture over each one, allowing the sponge to absorb fully.
- Refrigerate the cups for at least four hours, preferably overnight, so the flavors meld beautifully.
- Just before serving, top with whipped cream, a sprinkle of cinnamon, or fresh fruit for brightness.
A little patience goes a long way with this recipe. The longer the sponge sits with the milk, the richer and creamier it becomes.
Cooking Techniques and Tips
How to Cook Mini Three Milk Cups Perfectly
The secret to perfect mini three milk cups is starting with a sponge that can hold liquid without falling apart. Avoid using a dense cake; instead, opt for one that has plenty of air pockets to soak up the milk. When pouring the milk mixture, go slowly—this allows the sponge to absorb evenly. Refrigeration is non-negotiable, as chilling firms up the texture and enhances flavor.
Common Mistakes to Avoid
One of the most common mistakes is overbaking the sponge, which leads to a dry, crumbly texture that won’t absorb the milk well. Another misstep is rushing the soaking process—if you pour too quickly, the milk will pool at the bottom instead of evenly soaking through. Finally, avoid serving too soon; the dessert needs time to rest in the fridge to achieve its signature creamy texture.

Health Benefits and Serving Suggestions
Nutritional Value of Mini Three Milk Cups
While these little cups are a sweet indulgence, they do bring some nutritional value. Eggs and milk contribute protein and calcium, and the dessert is more satisfying in smaller portions, helping with mindful eating. If you make substitutions like coconut milk or lactose-free options, the recipe can be tailored to different dietary needs without losing its charm.
Best Ways to Serve and Pair This Dish
Mini three milk cups shine when served chilled. Pair them with fresh berries for a refreshing contrast or drizzle caramel sauce for added richness. They also go wonderfully with a cup of strong coffee or spiced tea, balancing sweetness with a touch of bitterness. For festive occasions, topping them with whipped cream swirls and sprinkles can make them feel celebratory.
FAQ
What type of sponge is best for mini three milk cups?
A light and airy sponge cake works best. Genoise or chiffon cake absorbs the milk beautifully without becoming soggy.
Can I use dried milk instead of fresh milks?
It’s best to use liquid forms for the three milks. However, reconstituted powdered milk can substitute for evaporated milk in a pinch, though the flavor won’t be quite as rich.
How do I store leftover mini three milk cups?
Store them covered in the refrigerator for up to three days. The flavors deepen over time, making them even better the next day.
Can I freeze mini three milk cups?
Freezing is not recommended, as the texture of the sponge changes and the milk mixture can separate. They’re best enjoyed fresh from the fridge.
Conclusion
If you’re like me, you’ll find there’s something comforting about serving desserts that feel personal and thoughtful. Mini three milk cups aren’t just a recipe—they’re a moment in a cup, ready to be shared with friends and family. The creamy richness, the tender sponge, and the joy of having your own little portion make them unforgettable. Trust me, you’ll want to make this again and again, whether it’s for a special celebration or just because you deserve a little sweetness in your day.
Would you like me to also create a meta description, title tag, and FAQ schema markup for this recipe so it’s fully SEO-optimized for WordPress?
Print
Mini Three Milk Cups
A delightful dessert made with layers of sponge cake soaked in a harmonious blend of three milks, perfect for gatherings.
- Total Time: 45 minutes
- Yield: 6 servings
Ingredients
- Sponge cake or ladyfingers
- 1 cup evaporated milk
- 1 cup sweetened condensed milk
- 1 cup heavy cream
- 1 teaspoon vanilla extract
- Optional toppings: fresh fruits, chocolate shavings, or berries
Instructions
- Prepare the Cake Base: Bake sponge cake according to package instructions, let it cool, and cut it into small cubes.
- Mix the Milks: In a bowl, combine evaporated milk, sweetened condensed milk, heavy cream, and whisk in vanilla.
- Assemble the Cups: Layer sponge cake pieces in cups, pour the milk mixture over, and let sit in the refrigerator for at least 2 hours, preferably overnight.
- Garnish and Serve: Add whipped cream, fresh fruits, or cinnamon before serving.
Notes
Allow soaking time for better flavor absorption. Chill before serving.
- Prep Time: 15 minutes
- Cook Time: 30 minutes
- Category: Dessert
- Method: Chilling
- Cuisine: Latin American
- Diet: Vegetarian