There’s a certain joy that comes from baking for my furry friends, especially when it involves making my own Homemade Dog Dental Treats. I still remember the first time I decided to whip them up. My sweet Labrador, Charlie, had been battling some pesky dental issues, and the vet recommended giving him crunchy treats to help keep his teeth clean. One sunny afternoon, as I tossed around ideas for what to make, memories of my grandmothers’ kitchen wafted back to me—filled with love, scents of baked goods, and a mutual understanding that food is a way to heal. That day, with flour dust dancing in the air and Charlie’s eager eyes fixed on me, I set to work creating a batch of those delightful treats.
As I kneaded the dough, I could almost feel the warmth of my grandmother’s hand on my shoulder, guiding me. I combined healthy ingredients, letting the natural flavors blend into something special just for him. The moment I pulled those golden-brown treats from the oven, the house filled with an irresistible aroma that had Charlie wagging his tail in approval. For me, these Homemade Dog Dental Treats became more than just a remedy for his teeth—they were a way to share a piece of my heart and my kitchen with my beloved companion.
Flavor and Popularity
The Unique Flavor Profile of Homemade Dog Dental Treats
When it comes to Homemade Dog Dental Treats, flavor matters just as much as nutrition. Imagine a blend of wholesome ingredients that come together to create something both tasty and healthful for our four-legged friends. The key to capturing that unique flavor profile is choosing fresh, delightful ingredients that complement each other beautifully.
For the base, I often use whole wheat flour or oats, which provide a wholesome structure and give that crunchy texture dogs love. Adding in some peanut butter, which many dogs—Charlie included—can’t resist, brings a nutty sweetness that’s not only tasty but also packed with protein. A touch of pumpkin puree adds moisture, a mild earthiness, and a pop of color, ensuring that these treats aren’t just delicious but also visually appealing.
Why This Recipe Is a Family Favorite and Crowd-Pleaser
Every family has their secrets, but my Homemade Dog Dental Treats have quickly become a beloved staple. All my friends and neighbors know that when they bring their dogs to visit, I’ll have a fresh batch waiting. The smiles on their faces, both human and canine, are priceless.
Why does it work? It’s not just the taste; it’s the love infused in every treat. These biscuits are simple yet satisfyingly crunchy, perfect for helping keep their teeth polished and breath fresh. Plus, the laughter that erupts when Charlie performs his delightful tricks for treats never goes unnoticed. It feels wonderful to share this joyful experience and watch our pets enjoy something made from the heart.
Ingredients and Preparation
Essential Ingredients and Possible Substitutions
To create these Healthy Homemade Dog Dental Treats, you’ll need a handful of key ingredients:
- Whole wheat flour or oats: Base for that chewy texture. If you have gluten sensitivity concerns, feel free to replace these with a gluten-free alternative like almond flour or coconut flour.
- Peanut butter (unsweetened): Dogs adore it for its deliciousness. Almond or sunflower seed butter also serves as excellent substitutes if you’re aiming for a different flavor or have nut allergies.
- Pumpkin puree (canned or fresh): This adds texture and is beneficial for digestion. If pumpkin isn’t on hand, you can swap it with sweet potato puree, which gives a similar consistency.
- Eggs: Bind everything together. For a vegan version, try using flaxseed meal mixed with water as a substitute.
- Baking soda: Helps in rising, giving those treats a nice puff. If you’re looking for natural alternatives, a yeast-based component could work, too.
- Water or stock: Needed to adjust the dough consistency. Use low-sodium chicken or beef stock for added flavor, but stick with plain water if you’re keeping it veggie-minded.
Step-by-Step Recipe Instructions with Tips
Now that we have our ingredients ready, let’s dive into creating these delightful Homemade Dog Dental Treats:
-
Preheat the oven to 350°F (175°C) and line a baking sheet with parchment paper—this will keep your treats from sticking.
-
In a mixing bowl, combine 2 cups of whole wheat flour, ½ cup of unsweetened peanut butter, 1 cup of pumpkin puree, and 1 egg. Mix until the dough comes together. If it seems too dry, add a splash of water or stock. Conversely, if it feels sticky, sprinkle in a tad more flour.
-
Knead the dough for a couple of minutes on a floured surface. This helps make it homogenous and more enjoyable to work with.
-
Roll out the dough to about ½ inch thick. Now’s the time to get creative—use cookie cutters in fun shapes or just cut it into small squares.
-
Place your cutouts on the parchment-lined baking sheet. Leave a little space between them, as they might puff up while baking.
-
Bake for 25-30 minutes, or until they turn golden brown and feel firm to the touch. The smell wafting through your kitchen will be irresistible!
-
Let them cool completely before serving to give them that perfect crunch. Store any leftovers in an airtight container—not that they’ll last long!
Cooking Techniques and Tips
How to Cook Homemade Dog Dental Treats Perfectly
Cooking Homemade Dog Dental Treats can be a true joy, but a few techniques can help ensure your treats turn out perfect every time. First, make sure you measure your ingredients accurately. Too much flour can lead to tough treats, while too little might yield a mess!
As you knead, think of it as a labor of love—it should feel smooth but not too sticky. Rolling out the dough evenly also aids in achieving that uniform bake. And don’t forget the baking time! When they’re golden and firm, they’re ready to cool and become a delightful gift for your furry buddy.
Common Mistakes to Avoid
While the process is relatively straightforward, I’ve found some common pitfalls that can easily be avoided:
- Not checking ingredient quality: Always use fresh ingredients; stale or spoiled items can lead to sad treats and upset tummies.
- Skipping the cooling step: Allowing them to cool completely gives that satisfying crunch we all love. Otherwise, they’ll end up soft and chewy, which isn’t what we’re going for!
- Assuming all dogs have similar tastes: Just like us, each pup has their unique preferences. Experiment with flavors and find what makes your pooch wag their tail the hardest.
Health Benefits and Serving Suggestions
Nutritional Value of Homemade Dog Dental Treats
Homemade Dog Dental Treats are not only delicious but can also offer several health benefits. The combination of ingredients provides protein, fiber, and essential vitamins. The whole wheat or oat base aids in digestion, while pumpkin is known for its nutrient-packed profile and digestive benefits.
Peanut butter is a great source of healthy fats and protein which can contribute to a shiny coat and overall health. Plus, the crunchy texture helps to clean dogs’ teeth and gums, making them an excellent option for keeping breath fresh.
Best Ways to Serve and Pair This Dish
Serving Homemade Dog Dental Treats can be a fun experience. You can try hiding them in a puzzle toy for some interactive playtime or even bringing them out at puppy playdates—this will surely impress the furry guests! For a little treat beyond snack time, consider pairing them with some fresh water if it’s a warm day or just enjoy watching your dog savor each bite.
FAQ Section
What type of mushrooms are best for Homemade Dog Dental Treats?
While mushrooms can be a flavorful addition in some dog treats, it’s essential to be cautious. Generally, it’s best to avoid mushrooms altogether, as many common varieties can be toxic to dogs. Stick to dog-safe ingredients like pumpkin or peanut butter for safe Homemade Dog Dental Treats.
Can I use dried garlic instead of fresh?
It’s not advisable to use garlic in any form for dog treats. Even in small amounts, garlic can be harmful to dogs. If you’re looking for additional flavor, you might consider dog-friendly herbs like parsley that can freshen breath.
How do I store leftover Homemade Dog Dental Treats?
To keep your treats fresh, store them in an airtight container at room temperature. If you want to extend their shelf life, you can refrigerate them for a few weeks or freeze them for longer storage.
Can I freeze Homemade Dog Dental Treats?
Absolutely! Freezing is a great way to preserve your Homemade Dog Dental Treats. Just make sure to store them in an airtight container or freezer-safe bag. Thaw them out at room temperature when you’re ready to celebrate those tail wags.
As I put the final touches on this treasured recipe, I can’t help but feel excited to share it with you. If you’re like me and consider your pets family, then bringing love into the kitchen with these Homemade Dog Dental Treats is a must. There’s something comforting about creating something wholesome, knowing it bolsters their health and wellbeing. Trust me, you’ll want to make this again and again—your beloved pups will thank you with every wag!
Print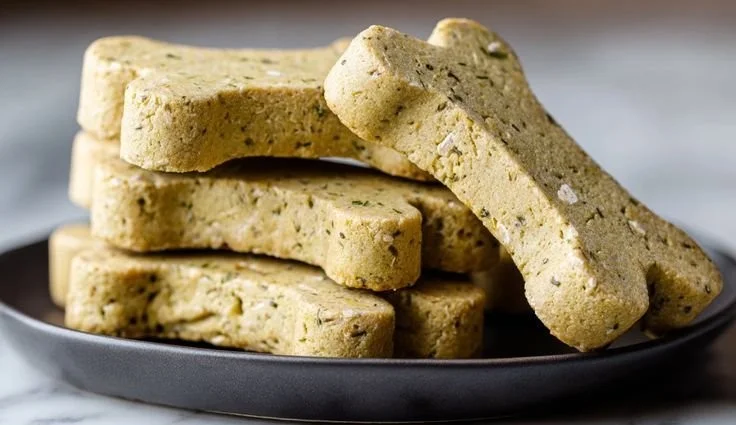
Homemade Dog Dental Treats
Wholesome and crunchy homemade dog treats that promote dental health and provide a delicious snack for your furry friends.
- Total Time: 45 minutes
- Yield: 20 servings
Ingredients
- 2 cups whole wheat flour (or oats)
- ½ cup unsweetened peanut butter
- 1 cup pumpkin puree (canned or fresh)
- 1 egg
- 1 tsp baking soda
- Water or low-sodium stock to adjust consistency
Instructions
- Preheat the oven to 350°F (175°C) and line a baking sheet with parchment paper.
- In a mixing bowl, combine the flour, peanut butter, pumpkin puree, and egg. Mix until the dough comes together, adjusting with water or stock as necessary.
- Knead the dough for a couple of minutes on a floured surface.
- Roll out the dough to about ½ inch thick and cut into shapes or squares.
- Place cutouts on the baking sheet, leaving space between them.
- Bake for 25-30 minutes, or until golden brown and firm to the touch.
- Let cool completely before serving and store leftovers in an airtight container.
Notes
Ensure all ingredients are fresh for the best results. Experiment with different shapes and sizes for fun.
- Prep Time: 15 minutes
- Cook Time: 30 minutes
- Category: Dog Treats
- Method: Baking
- Cuisine: Homemade
- Diet: None