Ah, the first time I ever made Crunchy Pumpkin Peanut Butter Wafers, I could hardly contain my excitement! It was a crisp autumn afternoon, and the golden leaves danced along the sidewalks of Asheville. My kitchen filled with the warm, inviting scent of roasted pumpkin mingling with rich peanut butter, and memories washed over me like a gentle breeze. I can still see my grandmother in her apron, guiding me through those early lessons in the kitchen. She always said, “Cooking is about creating joy,” and I knew in my heart that these delightful wafers would be a perfect way to spread a little happiness.
As I mixed the ingredients, I was taken back to family gatherings where laughter echoed off the walls and love was woven through every meal. Everyone would gather ’round the table, and every once in a while, a cheerful crunch would sound, heralding the arrival of a delicious dish. These crispy treats were destined to become a new family favorite, beloved not just for their delightful flavor but for the warmth they brought to every gathering and cozy night in. Each crunchy bite of those pumpkin peanut butter wafers was a reminder that simple food could forge connections and create lasting memories.
Flavor and Popularity
The Unique Flavor Profile of Crunchy Pumpkin Peanut Butter Wafers
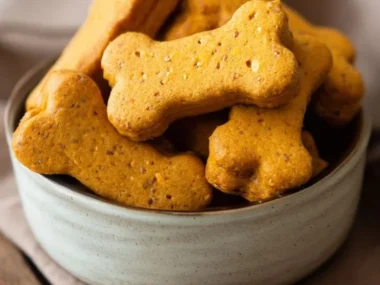
Crunchy Pumpkin Peanut Butter Wafers deliver a delightful balance of flavors and textures that sets them apart from typical snacks. Imagine the earthy sweetness of roasted pumpkin, perfectly complemented by the nutty richness of creamy peanut butter. This dynamic duo is further enhanced by a sprinkle of cinnamon and a dash of salt, allowing each bite to ignite your taste buds. The wafers are crispy, with a delightful crunch that contrasts beautifully against the velvety filling.
What’s more, these wafers are incredibly versatile. The comforting flavors evoke memories of fall, making them a perfect treat during those cozy evenings. In the South, we have a special affinity for incorporating seasonal ingredients into our recipes, and pumpkin certainly ranks high on that list. Not only do they satisfy cravings, but these treats resonate with nostalgia, reminding you of harvest time and heartfelt gatherings around the family table.
Why This Recipe Is a Family Favorite and Crowd-Pleaser
Beyond their irresistible flavor, Crunchy Pumpkin Peanut Butter Wafers have an undeniable charm that makes them cherished by friends and family alike. They are simple to make yet elegant enough to impress guests at any occasion. This recipe translates easily to any gathering—from Thanksgiving feasts to backyard barbecues—where everyone can enjoy the wholesome taste and familiar warmth of a homemade treat.
Children adore the combination of peanut butter and pumpkin, and adults appreciate how well they can pair with coffee or tea. I’ve often made these for holiday parties, and the looks on people’s faces as they take their first bites? Priceless! Their thumbs-up and happy chatter solidify these wafers as a must-have during festivities and family get-togethers.
Ingredients and Preparation
Essential Ingredients and Possible Substitutions
To create those delicious Crunchy Pumpkin Peanut Butter Wafers, we start with some basic yet essential ingredients that harmonize beautifully:
- Pumpkin puree: The star of the show! Opt for fresh pumpkin for a robust flavor or a good-quality canned puree if time is short.
- Peanut butter: Choose creamy for a smooth filling or chunky for some added texture.
- Flour: A all-purpose flour works well here, but feel free to experiment with whole wheat or a gluten-free blend.
- Sugar: Brown sugar adds a lovely depth of flavor, but granulated sugar is perfectly acceptable if that’s what you have on hand.
- Egg: Acts as a binding agent. For an egg-free version, consider using a flaxseed or chia seed egg substitute.
- Butter: Softened butter adds richness, but for a dairy-free option, coconut oil can be used.
- Spices: Cinnamon, nutmeg, and a touch of salt enhance the warm flavors beautifully.
If you’re looking for some flexibility, here are a few ideas: Swap out the pumpkin for sweet potato for a different flavor twist or use almond butter instead of peanut butter for those with nut allergies. The world is your oyster!
Step-by-Step Recipe Instructions with Tips
1. Prepare the Ingredients
Start by preheating your oven to 350°F (175°C). Line a baking sheet with parchment paper for easy cleanup. Gather all your ingredients and measure them out to make the process smooth.
2. Mix the Base
In a large mixing bowl, combine the pumpkin puree and peanut butter until smooth. Then, add the sugar and mix well. Next, incorporate the egg and softened butter, blending everything until you have a creamy mixture.
3. Combine Dry Ingredients
In another bowl, whisk together the flour, spices, and a pinch of salt. Gradually add this dry mixture to the wet ingredients, stirring until just combined. Be careful not to overmix—keeping it a bit lumpy adds to the charm!
4. Form the Wafers
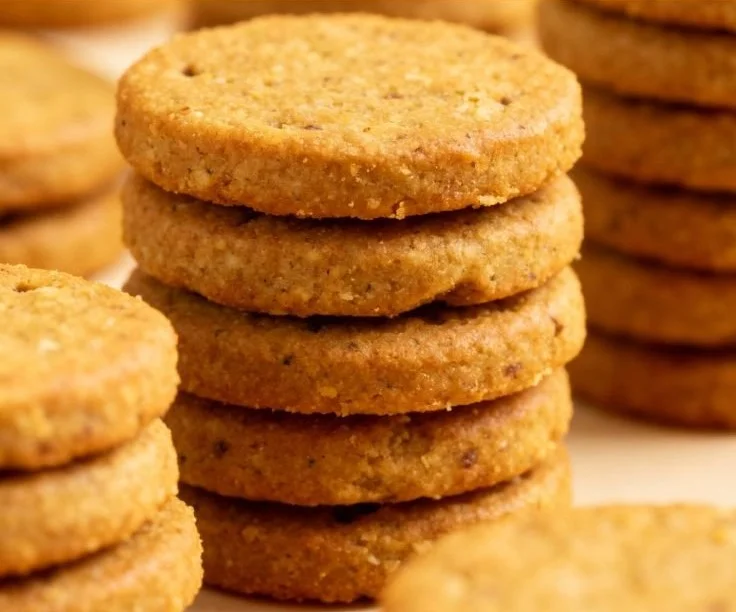
Using a spoon or a small cookie scoop, drop rounded tablespoons of dough onto the prepared baking sheet, leaving space in between each one. Flatten them slightly with the back of a spoon to achieve that classic wafer shape.
5. Bake
Place the baking sheet in the preheated oven and bake for about 12-15 minutes or until the edges are lightly golden. For an extra crunchy texture, allow them to cool on the baking sheet for a few minutes before transferring them to a wire rack.
6. Cool and Enjoy
Once cooled, serve immediately or store them in an airtight container. Trust me, you might need to hide a few for yourself—these babies disappear quickly!
Cooking Techniques and Tips
How to Cook Crunchy Pumpkin Peanut Butter Wafers Perfectly
Ensuring your Crunchy Pumpkin Peanut Butter Wafers come out perfectly takes a little attention to detail. Here are a few tips:
- Mixing Carefully: When combining the dry and wet ingredients, be careful not to overmix. A few lumps are perfectly fine and lead to a more rustic texture.
- Oven Temperature: Make sure your oven is fully preheated before placing the wafers in. This helps them rise and crisp up nicely.
- Cooling Time: Allow the wafers to cool on the pan briefly before moving them to a rack. This lets them firm up and prevents them from breaking apart.
Common Mistakes to Avoid
- Too Much Flour: Avoid packing flour into your measuring cup. Spoon it in lightly to ensure your wafers don’t turn out dry.
- Skipping the Parchment: Using parchment paper is key to avoiding a sticky mess. It prevents the wafers from sticking to the baking sheet, ensuring they retain their perfect shape.
- Ignoring Check Times: Ovens can vary, so check your wafers a minute or two early to prevent overbaking. You want them lightly golden and not too dark!
Health Benefits and Serving Suggestions
Nutritional Value of Crunchy Pumpkin Peanut Butter Wafers
Beyond the delightful flavors, let’s not forget the healthy components of these wafers. Pumpkin is packed with vitamins A and C, offering antioxidant benefits and supporting a healthy immune system. Peanut butter provides protein and healthy fats that keep energy levels stable. These wafers can fit into a balanced diet, offering indulgence without the guilt.
Best Ways to Serve and Pair This Dish
Crunchy Pumpkin Peanut Butter Wafers shine in various settings. They pair perfectly with a hot cup of coffee for a cozy brunch or as a delightful snack alongside a glass of milk or plant-based alternative. For a fun twist, consider using them as a component in a layered dessert, perhaps with whipped cream and grated chocolate. They also make a delightful addition to a fall-themed charcuterie board, contrasting beautifully with cheeses and fruits.
FAQ Section
What type of mushrooms are best for Crunchy Pumpkin Peanut Butter Wafers?
While mushrooms aren’t typically part of this recipe, you can infuse your pumpkin filling with earthy flavors by sautéing mushrooms separately. Adding sautéed mushrooms to savory dishes would enhance overall taste in a different context.
Can I use dried garlic instead of fresh?
For this particular recipe, garlic isn’t used, but if you’re looking to spice it up in a similar savory treat, dried garlic can be substituted for fresh—just use half the amount since dried garlic is more concentrated.
How do I store leftover Crunchy Pumpkin Peanut Butter Wafers?
Store any leftover wafers in an airtight container at room temperature for up to a week. If you want to keep them longer, consider refrigerating them for up to two weeks.
Can I freeze Crunchy Pumpkin Peanut Butter Wafers?
Absolutely! Place the baked wafers in a single layer on a baking sheet and freeze until solid. Transfer them to a freezer-safe bag or container, where they can be stored for up to three months. Defrost them at room temperature before serving, and they’ll be as delicious as the day you made them.
As I reminisce about those crunchy pumpkin peanut butter wafers, I feel a warmth in my heart that goes beyond mere flavors. They embody the spirit of sharing love and laughter through food. If you’re like me, and you view cooking as a way to create joy, then this recipe is calling your name. Trust me, you’ll want to make this again and again. There’s something comfortingly nostalgic about inviting family and friends to partake in something so simple and yet so delightful. Enjoy every crunchy bite!
Print
Crunchy Pumpkin Peanut Butter Wafers
Deliciously crispy wafers made with roasted pumpkin and creamy peanut butter, perfect for cozy gatherings.
- Total Time: 30 minutes
- Yield: 24 servings
Ingredients
- 1 cup pumpkin puree
- 1 cup peanut butter
- 1 cup all-purpose flour
- 1/2 cup brown sugar
- 1 egg
- 1/2 cup softened butter
- 1 tsp cinnamon
- 1/2 tsp nutmeg
- 1/4 tsp salt
Instructions
- Preheat your oven to 350°F (175°C) and line a baking sheet with parchment paper.
- Combine the pumpkin puree and peanut butter in a large mixing bowl until smooth.
- Add the brown sugar, egg, and softened butter, mixing until creamy.
- Whisk together the flour, spices, and salt in another bowl, then gradually add to the wet mixture, stirring until just combined.
- Drop rounded tablespoons of dough onto the baking sheet, flattening them slightly with the back of a spoon.
- Bake for about 12-15 minutes or until edges are lightly golden. Allow to cool before transferring to a wire rack.
- Serve immediately or store in an airtight container.
Notes
For a gluten-free version, use a gluten-free flour blend. These wafers can be frozen for up to three months.
- Prep Time: 15 minutes
- Cook Time: 15 minutes
- Category: Snack
- Method: Baking
- Cuisine: American
- Diet: Vegetarian